August 27, 2017
PipQuest: A Vue Experiment
Back in 2012, I made a game called LexiCube with a couple of friends from school for Node Knockout, a weekend hackathon. It was a real-time multiplayer crossword game, where each face of a cube showed a random New York Times crossword (as pulled from some questionable third-party API).
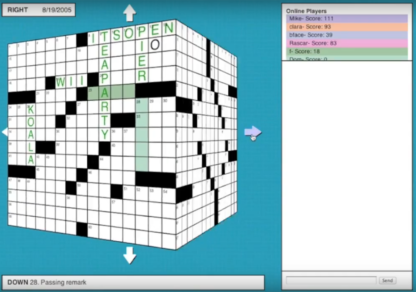
It was a lot of fun to build, and actually surprisingly fun to play. Sadly, it's no longer online, and upon revisiting the code I haven't been able to get it running due to some arcane dependency issue.
In any case, this weird game still occasionally crosses (ha!) my mind five years later, and when I decided I wanted to make a simple little game to practice Vue, an homage seemed appropriate. Initially I was intending to make a cube-pushing puzzler a la Chip's Challenge, only the levels would be on the surface of a cube. But then I thought: what if all those cubes were dice? I decided to roll with that (last pun, I promise) and theme it like a cheesy old-school JRPG.
Enter PipQuest
I did the bulk of the work on PipQuest over the course of a few weeks back in February & March of 2017. Then The Legend of Zelda: Breath of the Wild came out, I disappeared to Hyrule for a few weeks, and the project lost all momentum. In late August I finally decided to come back, polish it up a bit, and put it online.
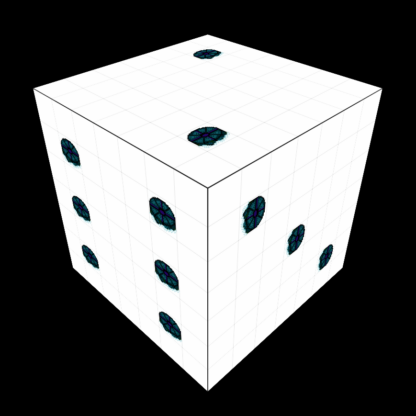
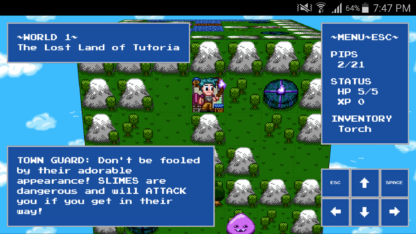
The premise of the game is pretty simple. Each level is a six-sided die, and you need to walk around the faces of the die and light up each pip to win the level. You do this just by bumping into them. Obviously, that wouldn't be much fun on it's own, so the game mostly centers around getting past the different obstacles (terrain/enemies) in each level to light the aforementioned pips.
Here's a snapshot of what's in the game:
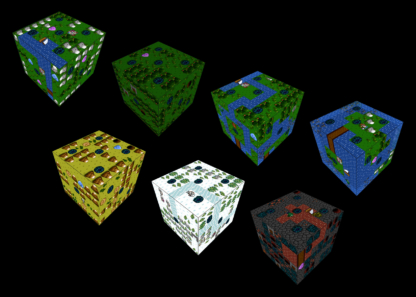
- 15 levels (for a total of 315 pips that need lighting)
- 4 world tilesets - grasslands, desert, snow, lava
- 7 enemy types based on old-school RPGs that share 6 different behaviors:
- pacers, which move back and forth across either the X or Y axis
- chasers, which chase the player if they are on the same cube face
- runners, which flee from the player if they are on the same cube face
- guards, which move around the level, hugging the wall to their left
- strafers, which move back and forth on the X axis and shoot the player on the Y axis
- sentries, which are immobile but shoot the player when they pass in front of them on the X axis
Play PipQuest (Chrome/Safari)
Why Vue?
Okay, so Vue isn't really intended for game dev - why use it? Well, the biggest reason is just that I was looking to get some more experience with it, as it's something co-workers have been using for projects at work. I have yet to do any client projects in it, but it's always good to be familiar with in case I get called on to maintain or update any of those.
At it's core, though, all the game is really doing is accepting some user inputs, updating some data, and updating the view to reflect that data. It's not really that unlike any other single-page application. PipQuest is a turn-based game, so framerate and performance aren't really the biggest concerns. Plus, being able to build out the interface in HTML/CSS/JS (which I'm already familiar with) is a huge advantage for me personally.
How it Works
Here's a quick summary of how the app is structured. The full code is available on the GitHub repo.
Components
The components used in the game are laid out like this:
- App - handles the logic about what menus/dialogs are on-screen (source)
- Title Screen - reading/clearing of info from local storage (source)
- Game Menu - similar functionality to above, but has additional screens and info (source)
- End Screen - static message (source)
- Dialog Window - displays current messages from the store (source)
- Die - handles the majority of the game logic (source)
Other Data
- Store - contains the app's state information, which is read and modified by components (source)
- Levels (x15) - JSON files describing each level (example)
- Local Storage - the player's current level and XP are saved in local storage so they can resume play
The bulk of the game logic like handling player input, loading levels, and managing enemy movement is done in the Die component, because most of these interactions require the ability to rotate the cube, which means applying a style to the die element. The game logic admittedly probably should be abstracted out to a separate file to keep things a bit tidier.
For state management, I'm using pretty much the simplest store possible. I considered trying Vuex but it seemed a little overly complex for this project. The store contains state information about the current level (and entities in it, like enemies), the player, what menus are currently being displayed, etc. When the store is updated, Vue automatically updates the components to reflect the new state.
The game "turn" is entirely based on player movement. When the player hits an arrow key, the player character attempts to move in that direction. If the tile in that direction is passable, the player character will move to it and all the enemies on the stage will move in pre-defined patterns based on their behavior setting. If the tile the player tries to move into isn't passable, the player character won't move and neither will the enemies. However, pips can still be activated without moving (which is important, because it means you can light pips at essentially instant speed without any enemies or projectiles moving into you).
Levels
Each level has a JSON file that identifies the level name, tileset, start position, enemy positions, item positions, message positions, and tile layout for each face of the die. You can view a full example here, but here's a peek at what the layout for the 1 face of the tutorial level looks like:
['A','A','A','A','A','A','A'],
['A','Y',' ','W','A','A','A'],
['A','Y','A',' ','A','F','A'],
['A','Y','A','●','F','F','A'],
['A','Y','Y','F','F','F','A'],
['A',' ',' ','Y','F','F','A'],
['A','A','A',' ','A','A','A']
Spaces are open fields, As are mountains, Ys are trees, Fs are impassable forests, the W is a town, and the ● is an unlit pip. Each character was initially intended to be readable as a pictograph so that I could build these maps in text files without having to remember what all the characters meant. That worked for a few tile types like mountains and pips, but as the number of different tile types increased that went out the window and I started just using first letters (like F for forest).
This level data is then loaded by the Die component in Vue, which has 6 child Face components. Each Face component then has 49 child Tile components, which make up a 7x7 grid.
In addition to the tile layouts, the level JSON file also contains information about entities on the level. For example, walking onto town tiles always shows a message to the player (message triggers are treated as "pickups"). Sometimes, there is an associated item pickup as well (in the tutorial level, walking onto one town shows you a message and gives you a sword). For a few specific use cases, I added some conditionals like having a specific item or defeating a certain group of enemies, so that the same town can display multiple messages after different conditions are met.
In the following example from the 7th level, the mayor of this town will display one message initially. When you come back with a sword, he'll show another message and give you a key. When you unlock a nearby gate with the key, he'll show a new message. When you defeat enemies tagged as being in group A (in this case, a few skeletons that emerge from the gate you opened), he'll display one last message and give you another key so you can proceed in the level.
pickups: [{
  type: 'message',
  location: { 'face': 2, 'row': 1, 'col': 1 },
  content: 'MAYOR: Something\'s gone wrong up in the MOUNTAINS. If you\'re willing to investigate, I can give you the KEY to the MOUNTAIN PASS, but I\'m not sending you up there UNARMED.',
  conditions: [{
    type: 'hasItem',
    value: 'sword',
    content: 'MAYOR: Alright, looks like you\'ve got yourself a WEAPON. Be careful up there! Come back and see me if you run into any TROUBLE!',
  },{
    type: 'tileValue',
    location: { 'face': 2, 'row': 1, 'col': 3 },
    value: 'I',
    content: 'MAYOR: OH MY GOD LOOK AT ALL THOSE SKELETONS! THIS WAS A TERRIBLE IDEA! YOU HAVE TO GET RID OF THEM!',
  },{
    type: 'enemyGroupDefeated',
    value: 'A',
    content: 'MAYOR: Thanks for taking care of all those SKELETONS. Earlier I forgot to mention there\'s an INNER GATE at the far side of the MOUNTAIN PASS. Here\'s the key to that one.',
  }]
},{
  type: 'key',
  location: { 'face': 2, 'row': 1, 'col': 1 },
  container: 'hidden',
  conditions: [{
    type: 'hasItem',
    value: 'sword',
  }]
},{
  type: 'key',
  location: { 'face': 2, 'row': 1, 'col': 1 },
  container: 'hidden',
  conditions: [{
    type: 'enemyGroupDefeated',
    value: 'A',
  }]
}]
This kind of conditional system wasn't something I was planning to do initially, but ended up being pretty easy to implement and allows for some interesting level design options. A lot of the design decisions like this just came about when trying to build unique levels.
Another example of this: an early version of the game had sea serpents that shot blue fireballs at you if you got in front of them, but as I was testing this and deciding what kind of terrain should block fireballs, I saw a fireball hit a pip and fizzle out. Immediately I was like "Oh! Those should light pips when they hit them!" and that became a mechanic used throughout a few different levels. I ended up changing the color of the fireballs to purple to match the pips and torch, so it would be a bit more intuitive for players that they could be used in this way.
Cubes Are Hard
One of the more complicated parts of this project was the cube rotations. As a web developer, I don't spend a lot of time working with 3D, so my brain isn't overly accustomed to this kind of thinking.
David DeSandro and Paul Hayes wrote articles on the topic that were super helpful as starting points. Since we're using one of these CSS cubes in a game situation in which our player character will be moving around on the cube's faces, we have some additional requirements:
- We always need to top of the current face to be oriented upwards, so that the artwork isn't upside down and the controls work as intended.
- When moving to an adjacent face, we want the smallest transition possible so the rotation isn't jarring. This means that we can't have set rotations for each face, because the rotation transition would be different depending on the origin face.
To that second point, I did a lot of experimentation to get something that worked. There are still a few transitions here and there where the cube rotates in a visually odd way, but for the most part it feels pretty good.
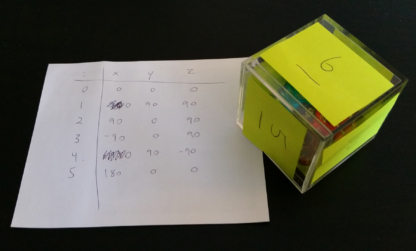
Here's how the rotations end up breaking down (relative to Face 1's position):
| Axis | Face 1 | Face 2 | Face 3 | Face 4 | Face 5 | Face 6 |
|---|---|---|---|---|---|---|
| X | 0 | 0 | +90deg | -90deg | 0 | +180deg |
| Y | 0 | +90deg | 0 | 0 | +90deg | 0 |
| Z | 0 | +90deg | +90deg | +90deg | -90deg | 0 |
But since we're not always starting at Face 1, we're not always going to be using:
transform: rotateX(90deg) rotateZ(90deg);Instead, we're dynamically adjusting the cube's rotation based on the origin and destination face of the player character.
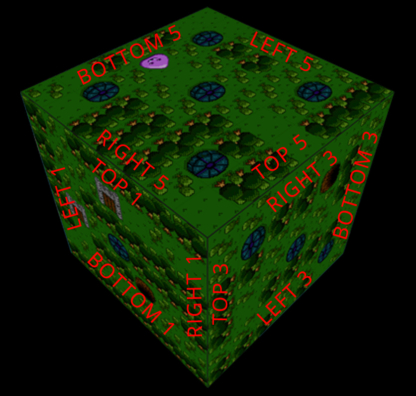
I did a lot of research initially to try to figure out if there was a "correct" layout for the faces on a die, but it turns out there are just a whole lot of variations. The only main constant I found was that opposite sides should add up to 7. So the 1 and 6 should be on opposite sides, as should 2/5 and 3/4. There seems to be no real method to the madness as far as orientation of those faces go (which edge is the "top" as far as the pips or numbers are oriented), so I had to experiment with that as well to figure out how to lay out the faces.
This table shows how the faces of PipQuest's dice are connected to one another. As an example, if I start on Face 3 and move off the right side of the face, I'm going to end up in the top row of Face 5.
| Edge | Face 1 | Face 2 | Face 3 | Face 4 | Face 5 | Face 6 |
|---|---|---|---|---|---|---|
| Top | Right 5 | Left 4 | Right 1 | Left 6 | Right 3 | Left 2 |
| Right | Top 3 | Bottom 1 | Top 5 | Bottom 5 | Top 1 | Bottom 3 |
| Bottom | Right 2 | Left 3 | Right 6 | Left 1 | Right 4 | Left 5 |
| Left | Bottom 4 | Top 6 | Bottom 2 | Top 2 | Bottom 6 | Top 4 |
Using the tables above, we can compare the X/Y/Z rotations of Face 3 vs. Face 5, and figure out that the cube will need to perform the rotation X: -90deg, Y: +90deg, Z: -180deg so that the top of the new face will be at the top of the screen.
To complicate all of the above, I also wanted the cube to tilt slightly depending on the player's proximity to the edge of their face. This allows you to sort of "peek" around the edge of the cube, to see if there's an enemy or obstacle in the adjacent space on a neighboring face. So when determining the rotation, we also need to look at the row and column of the player character and apply an adjustment based on that. If the player character is in the column on the edge, we'll add or subtract an additional 30deg. If they're one tile from the edge it'll be 18deg, and if they're two tiles from the edge it'll be 10deg. If they're in the middle row or column, no adjustment is applied for that axis. Depending on the face, the axis that the player's row or column position needs to affect is different.
It's also important to note that when an object (the player, an enemy, or a projectile) moves off of one face and onto another, its direction of movement needs to be updated to reflect the new face's orientation. In the example above, moving right off of the right edge of Face 3, I end up in the top row of Face 5 and to continue movement in a straight line around the cube, my direction is now down.
This can be a little bit odd for the player - if they're tapping the right arrow button and then move to the other face, another press of the right arrow button will move them in a direction different from the one they were originally heading. I ended up doubling the input delay when moving to a different face, which gives the player a few milliseconds to re-orient (while the cube itself is rotating) and helps to prevent any unintentional movements.
Assets
I created the backgrounds, tilesets, and sprites in Asesprite. I decided to exclusively use the NTSC NES palette to keep the old-school aesthetic. Each tile and sprite is 32x32 pixels, but is being displayed at double the size. The size of the main spritesheet is 256x256, but using the background-size property that is doubled to 512x512. The long list of image-rendering properties below prevent different browsers from applying any scaling/smoothing to the image so that it retains its pixel art quality. Depending on the type of entity, the background-position is then modified to the offset of the specific sprite, just like you might do when using sprites for icons on a website.
.entity {
  position: absolute;
  top:0;right:0;bottom:0;left:0;
  width: 64px;
  height: 64px;
  background-image: url('../assets/sprites.png');
  background-size: 512px 512px;
  image-rendering: optimizeSpeed;
  image-rendering: -moz-crisp-edges;
  image-rendering: -o-crisp-edges;
  image-rendering: -webkit-optimize-contrast;
  image-rendering: pixelated;
  image-rendering: optimize-contrast;
  -ms-interpolation-mode: nearest-neighbor;
}
All the sound effects were created with an online tool called ChipTone (requires Flash). I'm not going to lie, I didn't really know what I was doing here. I just played around with different effects until I got something that kind of worked.
Music was the one thing I knew I wasn't going to be able to create myself, so I looked around for some free chiptune music and found three free tracks from Visager and one from Eric Skiff. The different tracks are loaded based on the tileset of the current level.
A Note on Browser Support
PipQuest has some pretty major issues outside of WebKit browsers, so Chrome or Safari are your best bet. I don't currently have any plans to troubleshoot issues in Firefox / IE because, if I'm being honest, that's just not how I want to spend my free time.
I have however recently added some onscreen buttons that allow the game to be played on mobile devices. It's a little choppy on my 2-year old Android phone, but I was able to play through a few levels with no major issues.
Give it a Try!
There are a lot of other things I could talk about around the creation of PipQuest but this post is probably long enough already! Making it was a great way to learn a little more about Vue and I'd encourage anyone trying out a new framework or language to try making a simple game (even if that's not really what it's built for). Learning something like this can often be a struggle so it's important to be having fun while doing it!
Check out the game and see if you can save the world(s)!
Play PipQuest (Chrome/Safari)
As always, if you find any issues, report them on GitHub. If you have any questions or comments, tweet me @GregorTerrill.